1.Linux常用命令(五)
1.基础网络命令
ip address 显示主机网卡IP地址
[root@aspen ~]# ip a s eth0
2: eth0: <BROADCAST,MULTICAST,UP,LOWER_UP> mtu 1500 qdisc pfifo_fast state UP group default qlen 1000
    link/ether 00:0c:29:c4:ff:80 brd ff:ff:ff:ff:ff:ff
    inet 10.0.0.200/24 brd 10.0.0.255 scope global noprefixroute eth0
       valid_lft forever preferred_lft forever
    inet6 fe80::7f33:52f3:3051:7cb9/64 scope link noprefixroute
       valid_lft forever preferred_lft forever
ping IP地址 检查与目标IP地址的连通性
[root@aspen ~]# ping 220.181.57.216     #与目标地址通信正常
PING 220.181.57.216 (220.181.57.216) 56(84) bytes of data.
64 bytes from 220.181.57.216: icmp_seq=1 ttl=128 time=7.59 ms
64 bytes from 220.181.57.216: icmp_seq=2 ttl=128 time=9.30 ms
64 bytes from 220.181.57.216: icmp_seq=3 ttl=128 time=9.64 ms
64 bytes from 220.181.57.216: icmp_seq=4 ttl=128 time=8.38 ms
--- 220.181.57.216 ping statistics ---
4 packets transmitted, 4 received, 0% packet loss, time 3007ms
rtt min/avg/max/mdev = 7.592/8.733/9.646/0.807 ms
[root@aspen ~]# ping 10.0.0.2           #目标主机不可达
PING 10.0.0.2 (10.0.0.2) 56(84) bytes of data.
From 10.0.0.201 icmp_seq=1 Destination Host Unreachable
From 10.0.0.201 icmp_seq=2 Destination Host Unreachable
From 10.0.0.201 icmp_seq=3 Destination Host Unreachable
From 10.0.0.201 icmp_seq=4 Destination Host Unreachable
--- 10.0.0.2 ping statistics ---
5 packets transmitted, 0 received, +4 errors, 100% packet loss, time 4002ms
pipe 4
telnet IP地址 端口号 检测目标地址端口对应的TCP服务是否开启
[root@aspen ~]#telnet 10.0.0.201 22           #目标主机对应服务开启

Connecting to 10.0.0.201:22...
Connection established.
To escape to local shell, press 'Ctrl+Alt+]'.
SSH-2.0-OpenSSH_7.4
[root@aspen ~]#telnet 10.0.0.201 23           #目标主机对应服务未开启

Connecting to 10.0.0.201:23...
Could not connect to '10.0.0.201' (port 23): Connection failed.

Type `help' to learn how to use Xshell prompt.
route 显示主机路由表(Cent OS 6)
- -n 不解析主机名
- add/del default gw 网关地址 添加/删除默认路由
- add/del -net 网络地址/掩码 gw 网关地址 添加/删除路由
- add/del -host 主机地址 gw 网关地址 添加/删除主机路由
[root@aspen ~]# route -n
Kernel IP routing table
Destination     Gateway         Genmask         Flags Metric Ref    Use Iface
0.0.0.0         10.0.0.254      0.0.0.0         UG    0      0        0 eth0
10.0.0.0        0.0.0.0         255.255.255.0   U     0      0        0 eth0
169.254.0.0     0.0.0.0         255.255.0.0     U     1002   0        0 eth0
169.254.0.0     0.0.0.0         255.255.0.0     U     1003   0        0 eth1
172.16.1.0      0.0.0.0         255.255.255.0   U     0      0        0 eth1
[root@aspen ~]# route add -net 172.16.1.0/24 gw 172.16.1.1
[root@aspen ~]# route -n | grep 172.16.1.1
172.16.1.0 172.16.1.1 255.255.255.0 UG 0 0 0 eth1|
Flags 说明
U 路由状态启用(直连链路)
UG 网关路由
UGH 主机路由
|
ip route 显示主机路由表(Cent OS 7)
- add default via 网关地址 添加默认路由
- add 网络地址/掩码 via 网关地址 添加路由
| 添加主机路由时,不用填写网络掩码 |
- del 网络地址 via 网关地址/掩码 删除路由
[root@aspen ~]# ip route show
default via 10.0.0.254 dev eth0
10.0.0.0/24 dev eth0 proto kernel scope link src 10.0.0.201
169.254.0.0/16 dev eth0 scope link metric 1002
169.254.0.0/16 dev eth1 scope link metric 1003
172.16.1.0/24 via 172.16.1.1 dev eth1
172.16.1.0/24 dev eth1 proto kernel scope link src 172.16.1.201
[root@aspen ~]# ip route del 172.16.1.0/24 via 172.16.1.1
[root@aspen ~]# ip route list
default via 10.0.0.254 dev eth0
10.0.0.0/24 dev eth0 proto kernel scope link src 10.0.0.201
169.254.0.0/16 dev eth0 scope link metric 1002
169.254.0.0/16 dev eth1 scope link metric 1003
172.16.1.0/24 dev eth1 proto kernel scope link src 172.16.1.201 | ip route == ip route show == ip route list |
| 开机主机路由转发功能
vim /etc/sysctl.conf #编写系统内核参数配置文件
net.ipv4.ip_forward = 1
sysctl -p #生效内核参数配置文件
net.ipv4.ip_forward = 1
|
[root@aspen ~]# vim /etc/sysctl.conf
# sysctl settings are defined through files in
......
net.ipv4.ip_forward=1
[root@aspen ~]# sysctl -p
net.ipv4.ip_forward = 1
ifup 网卡名 启用网卡
ifdown 网卡名 禁用网卡
|
在Xshell中管理服务器网卡,一般使用组合命令ifdown eth0 && ifup eth0 在Cent OS 7中可以使用systemctl restart network重启网卡 |
[root@aspen ~]# ifdown eth0 && ifup eth0
Device 'eth0' successfully disconnected.
Connection successfully activated (D-Bus active path: /org/freedesktop/NetworkManager/ActiveConnection/9)
[root@aspen ~]# systemctl restart network
ss 查看系统网络状态(获取系统socket 统计信息)
- -l 只显示处于监听状态的端口
- -n 解析服务的名称
- -t 显示 TCP 协议的 sockets
- -u 显示 UDP 协议的 sockets
- -p显示监听端口的进程
[root@aspen ~]# ss -lntup
Netid  State      Recv-Q Send-Q         Local Address:Port                        Peer Address:Port
tcp    LISTEN     0      128                        *:22                                     *:*                   users:(("sshd",pid=7218,fd=3))
tcp    LISTEN     0      100                127.0.0.1:25                                     *:*                   users:(("master",pid=7364,fd=13))
tcp    LISTEN     0      128                       :::22                                    :::*                   users:(("sshd",pid=7218,fd=4))
tcp    LISTEN     0      100                      ::1:25                                    :::*                   users:(("master",pid=7364,fd=14))
netstat 显示系统网络相关信息
- -a 显示系统中所有网络连接
- -l 只显示处于监听状态的端口
- -n 解析服务的名称
- -t 显示 TCP 协议的 sockets
- -u 显示 UDP 协议的 sockets
- -p显示监听端口的进程
[root@oldboyedu-aspen ~]# netstat -an | head -6
Active Internet connections (servers and established)
Proto Recv-Q Send-Q Local Address           Foreign Address         State
tcp        0      0 0.0.0.0:22              0.0.0.0:*               LISTEN
tcp        0      0 127.0.0.1:25            0.0.0.0:*               LISTEN
tcp        0     36 10.0.0.201:22           10.0.0.1:9865           ESTABLISHED
tcp6       0      0 :::22                   :::*                    LISTEN
[root@oldboyedu-aspen ~]# netstat -lntup
Active Internet connections (only servers)
Proto Recv-Q Send-Q Local Address           Foreign Address         State       PID/Program name
tcp        0      0 0.0.0.0:22              0.0.0.0:*               LISTEN      7163/sshd
tcp        0      0 127.0.0.1:25            0.0.0.0:*               LISTEN      7242/master
tcp6       0      0 :::22                   :::*                    LISTEN      7163/sshd
tcp6       0      0 ::1:25                  :::*                    LISTEN      7242/master
2.深入网络操作命令
nmap IP地址 对指定的IP地址进行端口扫描
- --p 端口/端口范围 指定扫描端口/端口范围
| Cent OS 7中默认没有安装该命令,需使用 yum install -y nmap 指令进行安装 |
[root@aspen ~]# nmap baidu.com #默认扫描对应IP地址或域名的所有端口

Starting Nmap 6.40 ( http://nmap.org ) at 2019-05-13 20:51 CST
Nmap scan report for baidu.com (123.125.114.144)
Host is up (0.0041s latency).
Other addresses for baidu.com (not scanned): 220.181.57.216
Not shown: 998 filtered ports
PORT    STATE SERVICE
80/tcp  open  http
443/tcp open  https

Nmap done: 1 IP address (1 host up) scanned in 72.32 seconds
[root@aspen ~]# nmap baidu.com -p 1-442  #扫描对应IP地址或域名的指定端口范围

Starting Nmap 6.40 ( http://nmap.org ) at 2019-05-13 20:54 CST
Nmap scan report for baidu.com (123.125.114.144)
Host is up (0.0050s latency).
Other addresses for baidu.com (not scanned): 220.181.57.216
Not shown: 441 filtered ports
PORT   STATE SERVICE
80/tcp open  http

Nmap done: 1 IP address (1 host up) scanned in 3.43 seconds

[root@aspen ~]# nmap baidu.com -p 1,2048  #扫描对应IP地址或域名的指定端口

Starting Nmap 6.40 ( http://nmap.org ) at 2019-05-13 20:52 CST
Failed to resolve "baidu.com".
WARNING: No targets were specified, so 0 hosts scanned.
Nmap done: 0 IP addresses (0 hosts up) scanned in 10.03 seconds
lsof 列举系统中已经被打开的文件
[root@aspen ~]# lsof | grep num.txt
tail      11729         root    3r      REG                8,3        81  134356551 /root/num.txt
3.请求资源类
| 通常情况下,我们更推荐使用wget进行下载,由于很多时候系统默认没有安装wget,我们偶尔会使用curl进行下载。 |
wget URL 将指定URL地址的文件下载到当前文件夹;
| 系统最小化安装时,默认没有安装wget指令,需要进行安装。 |
- -O /目录/文件名 指定文件下载的地址和名称;
[root@Tech /etc/yum.repos.d]# wget -O /opt/html www.baidu.com
--2022-01-06 15:29:48--  http://www.baidu.com/
Resolving www.baidu.com (www.baidu.com)... 110.242.68.4, 110.242.68.3
Connecting to www.baidu.com (www.baidu.com)|110.242.68.4|:80... connected.
HTTP request sent, awaiting response... 200 OK
Length: 2381 (2.3K) [text/html]
Saving to: ‘/opt/html’

/opt/html                     100%[==============================================>]   2.33K  --.-KB/s    in 0s

2022-01-06 15:29:48 (348 MB/s) - ‘/opt/html’ saved [2381/2381]
[root@Tech /etc/yum.repos.d]# ll /opt/html
-rw-r--r--. 1 root root 2381 Jan  6 15:29 /opt/html
curl URL 在线浏览网页资源内容(源代码)
- -L 追踪HTTP重定向
- -v 显示HTTP请求信息
- -H 指定参数添加至HTTP请求头
- -s 静默请求(不显示请求过程)
- -o 文件名 将请求结果写入指定文件
- -I 只返回HTTP Response头部信息
- -i 返回HTTP Response头部信息及页面信息内容(源代码)
[root@Tech ~]# curl -o /etc/yum.repos.d/CentOS-Base.repo https://mirrors.aliyun.com/repo/Centos-8.repo
% Total % Received % Xferd Average Speed Time Time Time Current
Dload Upload Total Spent Left Speed
100 2595 100 2595 0 0 13803 0 --:--:-- --:--:-- --:--:-- 13803
[root@Tech ~]# ll /etc/yum.repos.d/CentOS-Base.repo
-rw-r--r--. 1 root root 2595 Jan 6 15:20 /etc/yum.repos.d/CentOS-Base.repo
[root@Blog-Han ~]# curl -IL jd.com
HTTP/1.1 301 Moved Permanently
Date: Wed, 13 Dec 2023 13:31:29 GMT
Content-Type: text/html
Content-Length: 178
Connection: keep-alive
Location: https://www.jd.com
Server: jfe
Cache-Control: no-cache
HTTP/1.1 200 OK
Server: nginx
Date: Wed, 13 Dec 2023 13:31:30 GMT
Content-Type: text/html; charset=utf-8
Connection: keep-alive
Vary: Accept-Encoding
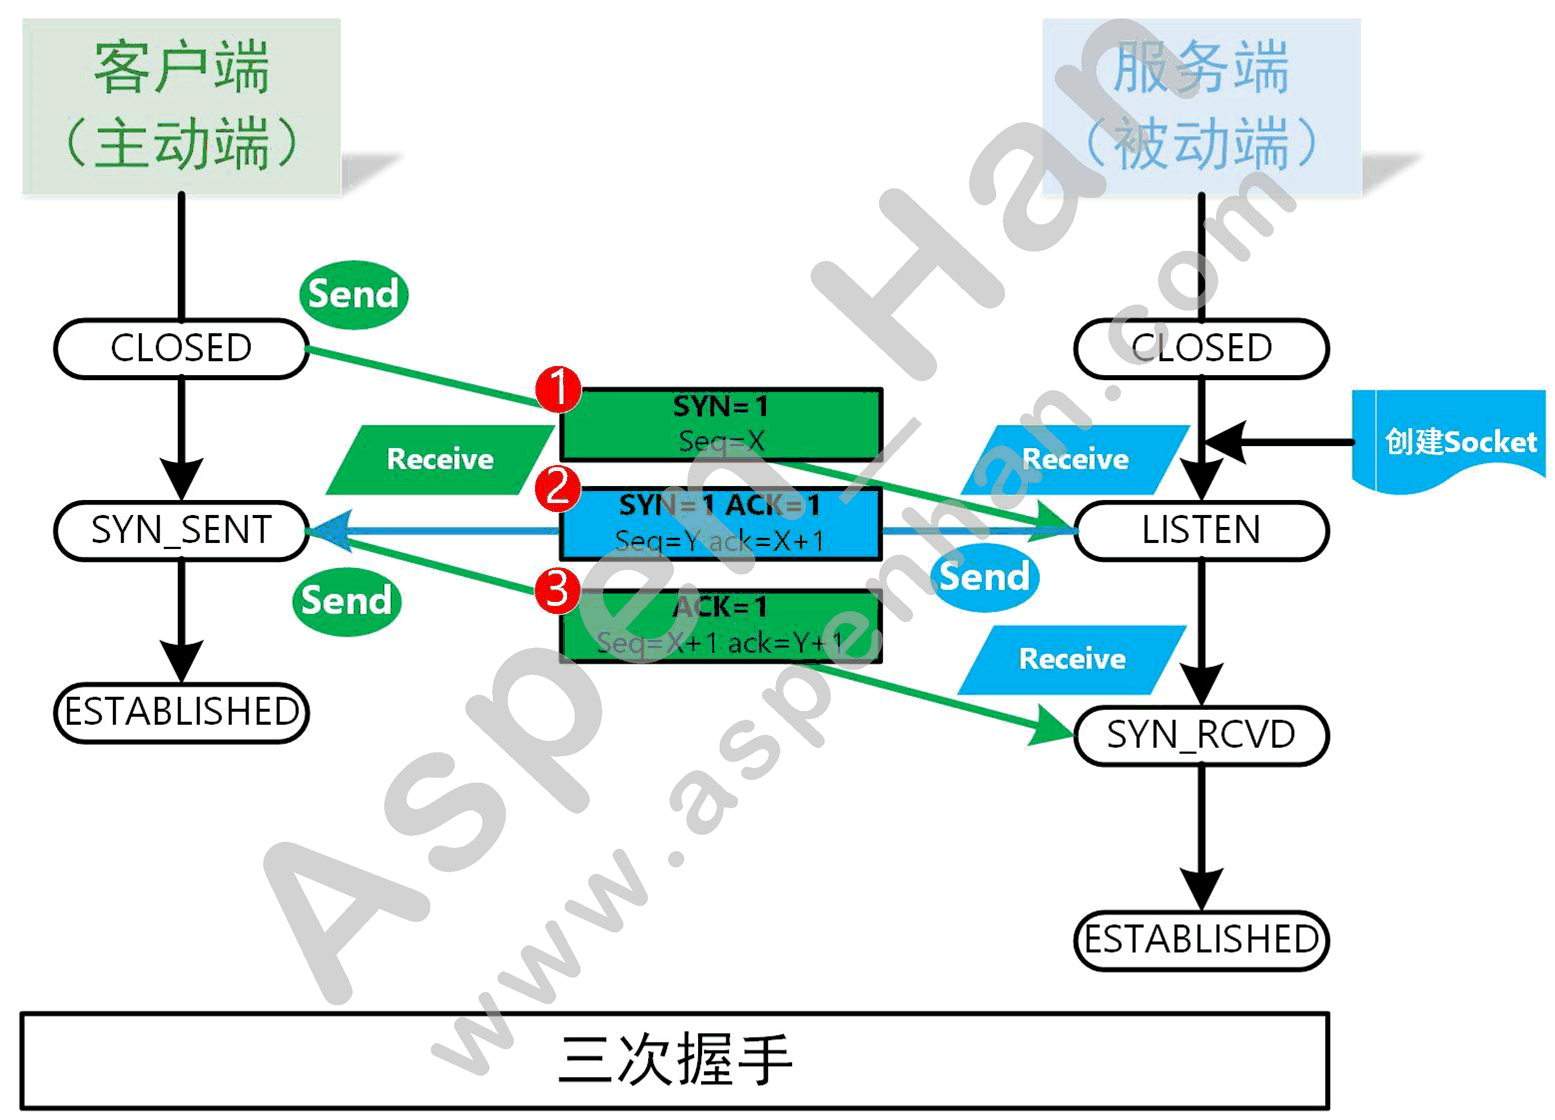
......附1:TCP的三次握手与四次挥手
TCP协议的是一种状态集
CLOSED、LISTEN、SYN_SENT、SYN_RCVD、ESTABLISHED、FIN_WAIT1、FIN_WAIT2、CLOSE_WAIT、TIME_WAIT、LAST_ACK、CLOSING
三次握手与状态转换
四次挥手与状态转换

|
端口号 0 TCP协议和UDP协议都不会使用 所以端口号范围事1-65535 cat /proc/sys/net/ipv4/ip_local_port_range 系统内核文件(系统客户端随机端口可用范围) 主机随机端口可用范围:表示主机的并发能力,可用端口越多表示主机并发能力越强; |
附2:DHCP服务配置
step1:安装dhcp服务
| yum install -y dhcp |
step2:编写dhcp服务端配置文件(/etc/dhcp/dhcpd.conf )
[root@oldboyedu-aspen ~]# vim /etc/dhcp/dhcpd.conf
#dhcpd test
subnet 172.16.1.0 netmask 255.255.255.0 {
  range 172.16.1.200 172.16.1.210;
  option domain-name-servers 223.5.5.5;
  option routers 172.16.1.254;
  option broadcast-address 172.16.1.255;
  default-lease-time 600;
  max-lease-time 7200;
}
step3:启动dhcp服务
| systemctl restart dhcpd systemctl enable dhcpd |
step4:功能验证
[root@oldboyedu-aspen /etc/sysconfig/network-scripts]# vim ./ifcfg-eth1
TYPE=Ethernet
BOOTPROTO=dhcp
NAME=eth1
DEVICE=eth1
ONBOOT=yes

[root@oldboyedu-aspen /etc/sysconfig/network-scripts]# ifconfig eth1
eth1: flags=4163<UP,BROADCAST,RUNNING,MULTICAST>  mtu 1500
        inet 172.16.1.200  netmask 255.255.255.0  broadcast 172.16.1.255
        inet6 fe80::20c:29ff:fe72:359  prefixlen 64  scopeid 0x20<link>
        ether 00:0c:29:72:03:59  txqueuelen 1000  (Ethernet)
        RX packets 0  bytes 0 (0.0 B)
        RX errors 0  dropped 0  overruns 0  frame 0
        TX packets 34  bytes 3520 (3.4 KiB)
        TX errors 0  dropped 0 overruns 0  carrier 0  collisions 0

[root@oldboyedu-aspen /etc/sysconfig/network-scripts]# route -n
Kernel IP routing table
Destination     Gateway         Genmask         Flags Metric Ref    Use Iface
0.0.0.0         172.16.1.254    0.0.0.0         UG    0      0        0 eth1
10.0.0.0        0.0.0.0         255.255.255.0   U     0      0        0 eth0
169.254.0.0     0.0.0.0         255.255.0.0     U     1002   0        0 eth0
169.254.0.0     0.0.0.0         255.255.0.0     U     1003   0        0 eth1
172.16.1.0      0.0.0.0         255.255.255.0   U     0      0        0 eth1
Linux命令要养成操作前备份,操作后检查的好习惯
未完待续...