一、概述
| nginx服务官方网站 |
1、功能
-
网站web服务
-
网站负载均衡
-
网站缓存功能
2、特点
-
并发能力强(尤其是针对静态资源)
-
占用系统资源少
3、企业常用Web服务软件
静态网站Web服务软件
-
apache
-
nginx
动态网站Web服务软件
-
php
-
tomcat(java)
-
python
Nginx与Apach服务对比
| 指标 | select(Apach) | epoll(Nginx) |
|---|---|---|
| 性能 | 随着连接数的增加性能积聚下降,处理成千上万并发连接数,性能很差 | 随着连接数的增加,性能基本没有下降,处理成千上万并发连接时,性能很好 |
| 连接数 | 连接数有限制,处理的最大连接数不超过1024,如果要处理的连接数超过1024个,则需要修改FD_SETSIZE宏,并重新编译 | 连接数无限制 |
| 内在处理机制 | 线性轮询 | 回调call back |
| 开发复杂性 | 低 | 中 |
4、nginx服务主要配置文件(官方源安装目录结构)
- /etc/nginx/nginx.conf 服务主配置文件
- /etc/nginx/conf.d/default.conf 虚拟主机配置文件
- /var/log/nginx/error.log 服务错误日志
- /var/log/nginx/access.log 服务访问日志
| 可以使用rpm -qc nginx命令 查询服务的配置文件 |
|
官方源安装,可以使用systemctl restart nginx命令 #启动nginx服务
编译安装,使用以下指令控制服务 /application/nginx-1.16.0/sbin/nginx #启动nginx服务
/application/nginx-1.16.0/sbin/nginx -s reload #重启nginx服务
/application/nginx-1.16.0/sbin/nginx -s stop #停止nginx服务
|
二、nginx服务的安装
|
官方源与非官方源安装的nginx软件的配置目录结构不同
官方源安装的nginx一般是最新的稳定版
非官方源安装的nginx一般是稳定版(不确定是否最新版)
|
1、YUM安装(官方源)
1.编译YUM配置文件,指定nginx官方源
nginx官方源文件配置规范
|
vim /etc/yum.repos.d/nginx.repo [nginx-stable] name=nginx stable repo baseurl=http://nginx.org/packages/centos/$releasever/$basearch/ gpgcheck=0 enabled=1 gpgkey=https://nginx.org/keys/nginx_signing.key |
[root@web01 ~]# rpm -qa nginx
[root@web01 ~]# vim /etc/yum.repos.d/nginx.repo
[nginx-stable]
name=nginx stable repo
baseurl=http://nginx.org/packages/centos/$releasever/$basearch/
gpgcheck=0
enabled=1
gpgkey=https://nginx.org/keys/nginx_signing.key
2.YUM安装nginx软件
| yum install -y nginx |
[root@web01 ~]# yum install -y nginx
......
Dependencies Resolved

==========================================================================================================
 Package            Arch                Version                           Repository                 Size
==========================================================================================================
Installing:
 nginx              x86_64              1:1.16.0-1.el7.ngx                nginx-stable              766 k

Transaction Summary
==========================================================================================================
......
Installed:
  nginx.x86_64 1:1.16.0-1.el7.ngx
[root@web01 ~]# nginx -v
nginx version: nginx/1.16.0
2、YUM安装(非官方源)
1.YUM安装nginx软件
| yum install -y nginx |
[root@web02 ~]# rpm -qa nginx
[root@web02 ~]# yum install -y nginx
......
Installed:
  nginx.x86_64 1:1.12.2-3.el7

Dependency Installed:
  dejavu-fonts-common.noarch 0:2.33-6.el7                dejavu-sans-fonts.noarch 0:2.33-6.el7
  fontconfig.x86_64 0:2.13.0-4.3.el7                     fontpackages-filesystem.noarch 0:1.44-8.el7
  gd.x86_64 0:2.0.35-26.el7                              gperftools-libs.x86_64 0:2.6.1-1.el7
  libX11.x86_64 0:1.6.5-2.el7                            libX11-common.noarch 0:1.6.5-2.el7
  libXau.x86_64 0:1.0.8-2.1.el7                          libXpm.x86_64 0:3.5.12-1.el7
  libxcb.x86_64 0:1.13-1.el7                             nginx-all-modules.noarch 1:1.12.2-3.el7
  nginx-filesystem.noarch 1:1.12.2-3.el7                 nginx-mod-http-geoip.x86_64 1:1.12.2-3.el7
  nginx-mod-http-image-filter.x86_64 1:1.12.2-3.el7      nginx-mod-http-perl.x86_64 1:1.12.2-3.el7
  nginx-mod-http-xslt-filter.x86_64 1:1.12.2-3.el7       nginx-mod-mail.x86_64 1:1.12.2-3.el7
  nginx-mod-stream.x86_64 1:1.12.2-3.el7

Complete!
[root@web02 ~]# nginx -v
nginx version: nginx/1.12.2
3、编译安装
1.获取源码文件(规范操作:将源码包下载到指定目录下)
| wget http://nginx.org/download/nginx-1.16.0.tar.gz |
[root@web03 ~]# mkdir /application /server/tools -p
[root@web03 ~]# ls /
application  boot  etc   lib    media  opt   root  sbin    srv  tmp  var
bin          dev   home  lib64  mnt    proc  run   server  sys  usr
[root@web03 ~]# cd /server/tools/
wget http://nginx.org/download/nginx-1.16.0.tar.gz
--2019-07-23 13:44:27--  http://nginx.org/download/nginx-1.16.0.tar.gz
Resolving nginx.org (nginx.org)... 62.210.92.35, 95.211.80.227, 2001:1af8:4060:a004:21::e3
Connecting to nginx.org (nginx.org)|62.210.92.35|:80... connected.
HTTP request sent, awaiting response... 200 OK
Length: 1032345 (1008K) [application/octet-stream]
Saving to: ‘nginx-1.16.0.tar.gz’

100%[================================================================>] 1,032,345   17.0KB/s   in 93s

2019-07-23 13:46:04 (10.9 KB/s) - ‘nginx-1.16.0.tar.gz’ saved [1032345/1032345]
2.解决软件安装的依赖问题
|
yum install -y pcre-devel openssl-devel
pcre-devel Perl语言正则信息兼容包
openssl-devel 部署https网站模块
|
[root@web03 /server/tools]# yum install -y openssl-devel pcre-devel
......
Installed:
  openssl-devel.x86_64 1:1.0.2k-16.el7_6.1                 pcre-devel.x86_64 0:8.32-17.el7

Dependency Installed:
  keyutils-libs-devel.x86_64 0:1.5.8-3.el7               krb5-devel.x86_64 0:1.15.1-37.el7_6
  libcom_err-devel.x86_64 0:1.42.9-13.el7                libkadm5.x86_64 0:1.15.1-37.el7_6
  libselinux-devel.x86_64 0:2.5-14.1.el7                 libsepol-devel.x86_64 0:2.5-10.el7
  libverto-devel.x86_64 0:0.2.5-4.el7                    zlib-devel.x86_64 0:1.2.7-18.el7

Dependency Updated:
  krb5-libs.x86_64 0:1.15.1-37.el7_6                     openssl.x86_64 1:1.0.2k-16.el7_6.1
  openssl-libs.x86_64 1:1.0.2k-16.el7_6.1

Complete!
3.解压源码包
| tar xf nginx-1.16.0.tar.gz |
[root@web03 /server/tools]# tar xf nginx-1.16.0.tar.gz -C /application/
[root@web03 /server/tools]# cd /application/
[root@web03 /application]# ls
nginx-1.16.0
4.进入指定目录,配置源码文件
| ./configure --prefix=指定程序保存目录 --user=nginx服务worker进程管理用户 --group nginx服务worker进程管理用户组 --with-http_ssl_module --with-http_stub-status_module |
|
--prefix=指定程序保存目录
--user=nginx服务worker进程管理用户
--group nginx服务worker进程管理用户组
激活或关闭某些模块
--with-http_ssl_module 激活HTTPS访问功能
--with-http_stub_status_module 激活nginx状态监控功能
|
[root@web03 /application/nginx-1.16.0]# ./configure --prefix=/application/nginx --user==www --group=www --with-http_ssl_module --with-http_stub_status_module
......
Configuration summary
  + using system PCRE library
  + using system OpenSSL library
  + using system zlib library

  nginx path prefix: "/application/nginx"
  nginx binary file: "/application/nginx/sbin/nginx"
  nginx modules path: "/application/nginx/modules"
  nginx configuration prefix: "/application/nginx/conf"
  nginx configuration file: "/application/nginx/conf/nginx.conf"
  nginx pid file: "/application/nginx/logs/nginx.pid"
  nginx error log file: "/application/nginx/logs/error.log"
  nginx http access log file: "/application/nginx/logs/access.log"
  nginx http client request body temporary files: "client_body_temp"
  nginx http proxy temporary files: "proxy_temp"
  nginx http fastcgi temporary files: "fastcgi_temp"
  nginx http uwsgi temporary files: "uwsgi_temp"
  nginx http scgi temporary files: "scgi_temp"

[root@web03 /application/nginx-1.16.0]# echo $?
0|
nginx编译安装好以后,如果需要额外激活或关闭某些nginx模块,需重新编译安装nginx; nginx安装虽然相比yum安装更加复杂,但是编译安装是最灵活的安装方式; |
5.编译源码包
| make |
[root@web03 /application/nginx-1.16.0]# make
make -f objs/Makefile
make[1]: Entering directory `/application/nginx-1.16.0'
cc -c -pipe  -O -W -Wall -Wpointer-arith -Wno-unused-parameter -Werror -g  -I src/core -I src/event -I src/event/modules -I src/os/unix -I objs \
    -o objs/src/core/nginx.o \
    src/core/nginx.c
......
-ldl -lpthread -lcrypt -lpcre -lssl -lcrypto -ldl -lpthread -lz \
-Wl,-E
sed -e "s|%%PREFIX%%|/application/nginx|" \
    -e "s|%%PID_PATH%%|/application/nginx/logs/nginx.pid|" \
    -e "s|%%CONF_PATH%%|/application/nginx/conf/nginx.conf|" \
    -e "s|%%ERROR_LOG_PATH%%|/application/nginx/logs/error.log|" \
    < man/nginx.8 > objs/nginx.8
make[1]: Leaving directory `/application/nginx-1.16.0'
[root@web03 /application/nginx-1.16.0]# echo $?
0
6.编译安装
| make install |
make install
make -f objs/Makefile install
make[1]: Entering directory `/server/tools/nginx-1.16.0'
test -d '/application/nginx-1.16.0' || mkdir -p '/application/nginx-1.16.0'
[root@web03 /server/tools/nginx-1.16.0]# ll /application/
total 0
drwxr-xr-x 6 root root 54 Jul 23 16:17 nginx-1.16.0
......
make[1]: Leaving directory `/server/tools/nginx-1.16.0'
[root@web03 /application/nginx-1.16.0/sbin]# ./nginx
[root@web03 /application/nginx-1.16.0/sbin]# pe -ef
-bash: pe: command not found
[root@web03 /application/nginx-1.16.0/sbin]# ps -ef | grep nginx
root 24509 1 0 16:22 ? 00:00:00 nginx: master process ./nginx
www 24510 24509 0 16:22 ? 00:00:00 nginx: worker process
root 24513 13008 0 16:23 pts/0 00:00:00 grep --color=auto nginx
[root@web03 /application/nginx-1.16.0/sbin]# ./nginx -v
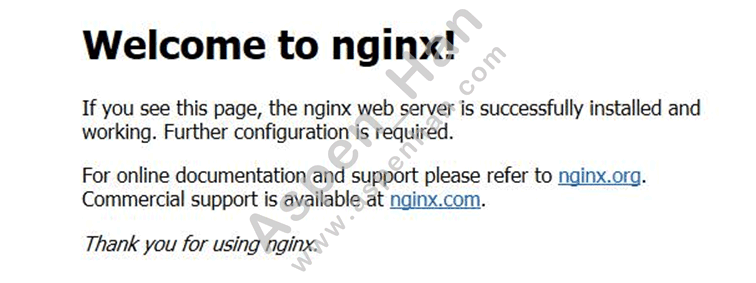
nginx version: nginx/1.16.0nginx安装并成功启动服务后,浏览器输入服务器对应IP地址并查看下图所示界面,即表示nginx安装成功
三、nginx服务目录结构(官方源安装)
1./etc目录
- logrotate.d/nginx nginx 服务日志轮询切割配置文件
- nginx/nginx.conf nginx服务主配置文件
- nginx/conf.d/default.conf 虚拟主机模版配置文件
|
接口参数配置文件 fastcgi_params PHP程序接口参数文件 uwsgi_params Python程序接口参数文件 scgi_params |
|
编码转换映射文件 koi-utf koi-win win-utf |
- mime.types nginx服务媒体资源类型配置文件
- modules nginx服务模块存放目录
2./usr目录
- nginx/modules nginx服务模块存放目录
|
nginx服务守护进程管理文件 lib/systemd/system/nginx-debug.service lib/systemd/system/nginx.service |
|
nginx服务终端管理命令 sbin/nginx-debug sbin/nginx 启动nginx服务 |
| -h/-? 查看nginx命令帮助说明 |
[root@web01 ~]# nginx -h
nginx version: nginx/1.16.0
Usage: nginx [-?hvVtTq] [-s signal] [-c filename] [-p prefix] [-g directives]

Options:
-?,-h         : this help
  -v            : show version and exit
  -V            : show version and configure options then exit
  -t            : test configuration and exit
  -T            : test configuration, dump it and exit
  -q            : suppress non-error messages during configuration testing
  -s signal     : send signal to a master process: stop, quit, reopen, reload
  -p prefix     : set prefix path (default: /etc/nginx/)
  -c filename   : set configuration file (default: /etc/nginx/nginx.conf)
-g directives : set global directives out of configuration file| -v 查看nginx服务版本 |
[root@web01 ~]# nginx -v
nginx version: nginx/1.16.0| -V 查看nginx服务配置参数 |
[root@web01 ~]# nginx -V
nginx version: nginx/1.16.0
built by gcc 4.8.5 20150623 (Red Hat 4.8.5-36) (GCC)
built with OpenSSL 1.0.2k-fips  26 Jan 2017
TLS SNI support enabled
configure arguments: --prefix=/etc/nginx --sbin-path=/usr/sbin/nginx --modules-path=/usr/lib64/nginx/modules --conf-path=/etc/nginx/nginx.conf --error-log-path=/var/log/nginx/error.log --http-log-path=/var/log/nginx/access.log --pid-path=/var/run/nginx.pid --lock-path=/var/run/nginx.lock --http-client-body-temp-path=/var/cache/nginx/client_temp --http-proxy-temp-path=/var/cache/nginx/proxy_temp --http-fastcgi-temp-path=/var/cache/nginx/fastcgi_temp --http-uwsgi-temp-path=/var/cache/nginx/uwsgi_temp --http-scgi-temp-path=/var/cache/nginx/scgi_temp --user=nginx --group=nginx --with-compat --with-file-aio --with-threads --with-http_addition_module --with-http_auth_request_module --with-http_dav_module --with-http_flv_module --with-http_gunzip_module --with-http_gzip_static_module --with-http_mp4_module --with-http_random_index_module --with-http_realip_module --with-http_secure_link_module --with-http_slice_module --with-http_ssl_module --with-http_stub_status_module --with-http_sub_module --with-http_v2_module --with-mail --with-mail_ssl_module --with-stream --with-stream_realip_module --with-stream_ssl_module --with-stream_ssl_preread_module --with-cc-opt='-O2 -g -pipe -Wall -Wp,-D_FORTIFY_SOURCE=2 -fexceptions -fstack-protector-strong --param=ssp-buffer-size=4 -grecord-gcc-switches -m64 -mtune=generic -fPIC' --with-ld-opt='-Wl,-z,relro -Wl,-z,now -pie'| -t nginx服务配置文件语法检查 |
[root@web01 ~]# nginx -t
nginx: the configuration file /etc/nginx/nginx.conf syntax is ok
nginx: configuration file /etc/nginx/nginx.conf test is successful| -s stop/quit/reopen/reload 停止/退出/重启/重载 nginx服务(常用于编译安装) |
[root@web01 ~]# nginx -s stop
[root@web01 ~]# ps -ef | grep nginx
root 17903 16915 0 17:23 pts/0 00:00:00 grep --color=auto nginx- share/nginx/html nginx服务默认站点目录
|
nginx服务帮助手册信息 share/doc/nginx-1.16.0 share/man/man8/nginx.8.gz |
3./var目录
- log/nginx/error.log nginx服务错误日志
nginx服务错误日志官方说明
|
错误日志格式: error_log /var/log/nginx/error.log warn; 错误日志指令 错误日志路径 错误日志级别 |
[root@web01 /etc/nginx/conf.d]# grep 'error' ../nginx.conf
error_log  /var/log/nginx/error.log warn;
[root@web01 /etc/nginx/conf.d]# tail -1 /var/log/nginx/error.log
2019/08/01 09:29:58 [error] 26625#26625: *6 open() "/var/html/www/favicon.ico" failed (2: No such file or directory), client: 10.0.0.1, server: www.aspen.com, request: "GET /favicon.ico HTTP/1.1", host: "www.aspen.com"- log/nginx/access.log nginx服务访问日志(分析用户访问行为)
nginx服务访问日志官方说明
|
访问日志格式: log_format main '\$remote_addr - \$remote_user [\$time_local] "\$request" ' '\$status \$body_bytes_sent "\$http_referer" ' '"\$http_user_agent" "\$http_x_forwarded_for"'; access_log /var/log/nginx/access.log main; main---定义日志格式名字
|
| 变量名 | 日志内容 | 说明 |
|---|---|---|
| $remote_addr | 10.0.0.1 | 客户端请求地址 |
| $remote_user | 访问网站认证用户信息(未开启认证,则没有内容) | |
| [$time_local] | [29/Jul/2019:11:14:59 +0800] | 客户端访问网站的时间信息 |
| $request | GET / HTTP/1.1 | HTTP请求头部起始行信息(尺寸过大,要考虑是否存在盗链情况) |
| $status | 200 | HTTP状态码信息 |
| $body_bytes_sent | 14 | 响应报文主体尺寸 |
| $http_referer | ||
| $http_user_agent | Firefox/68.0 | 请求客户端信息 |
| $http_x_forwarded_for | 透传客户端访问负载均衡到达Web结点的IP地址 |
[root@web01 /etc/nginx/conf.d]# tail ../nginx.conf|head -4
    log_format  main  '$remote_addr - $remote_user [$time_local] "$request" '
                      '$status $body_bytes_sent "$http_referer" '
                      '"$http_user_agent" "$http_x_forwarded_for"';
    access_log  /var/log/nginx/access.log  main;
[root@web01 /etc/nginx/conf.d]# tail -5 /var/log/nginx/access.log| head -1
10.0.0.1 - - [29/Jul/2019:11:14:59 +0800] "GET / HTTP/1.1" 200 14 "-" "Mozilla/5.0 (Windows NT 10.0; Win64; x64; rv:68.0) Gecko/20100101 Firefox/68.0" "-"- cache/nginx nginx缓存目录信息
四、主要配置文件说明
|
nginx服务配置文件是由多个区块组成 1、主区块(没有被{ }括起的部分) 2、事件区块 events {} 3、HTTP区块 HTTP {} ---指定网站服务加载的文件信息、访问日志信息、服务优化配置信息 4、server区块 server {} ---定义网站信息 5、location区块 location{} ---匹配区块、uri信息 6、if区块 if {} ---判断请求处理信息 |
1./etc/nginx/nginx.conf
user  www;                                                                    #---指定nginx服务的worker进程用户信息(在网站集群架构中,各种服务的虚拟用户不统一,可能会导致网站样式丢失)
worker_processes  1;                                                          #---指定nginx服务的worker进程的数量(1<=进程数量<=服务器CPU的核心数量)
error_log  /var/log/nginx/error.log warn;                                     #---指定nginx服务错误日志的保存路径(warn参数:定义日志记录错误信息的级别)
pid        /var/run/nginx.pid;                                                #---指定nginx服务的PID记录文件路径
events {
    worker_connections  1024;                                                 #---单个worker进程可以同时处理的链接数量(worker_connections<=系统文件描述符[系统打开文件数])
}
http {
    include       /etc/nginx/mime.types;                                      #---加载媒体资源类型文件
    default_type  application/octet-stream;                                   #---nginx服务默认加载类型文件
    log_format  main  '$remote_addr - $remote_user [$time_local] "$request" ' #---定义访问日志的格式
                      '$status $body_bytes_sent "$http_referer" '
                      '"$http_user_agent" "$http_x_forwarded_for"';
    access_log  /var/log/nginx/access.log  main;                              #---调用访问日志定义的格式,指定访问日志存储路径
    sendfile        on;
    #tcp_nopush     on;
    keepalive_timeout  65;                                                    #---设置TCP通讯的方式为长连接,长连接保持时间65秒;0为短连接;
    #gzip  on;
    include /etc/nginx/conf.d/*.conf;                                         #---加载/etc/nginx/conf.d/目录下所有以.conf结尾的配置文件(网站主机配置文件)
}|
补充说明 nginx服务进程 master进程:主进程,控制服务正常运行
worker进程:工作进程,处理用户请求进程
worker进程数量 增加worker进程的数量,相当于增加服务并行处理能力
worker进程最大数量 <= 服务器CPU的核心数量*2
日志记录级别 1、debug 调试级别。产生非常详细的日志记录信息
2、info 信息级别。产生详细的日志记录信息
3、notice 通知级别。产生日志记录信息
4、warn 警告级别。产生提示错误或不规范操作日志记录信息 (推荐级别)
5、error 错误级别。产生服务运行错误信息 (推荐级别)
6、crit 关键级别。产生服务运行的关键错误信息
7、alert 告警级别。产生服务运行的告警错误信息
8、emerg 灾难级别。产生服务运行灾难性错误信息
worker进程连接数量 查看系统文件描述符[ulimit -a open files (-n) 65535]
nginx服务最大的总并发连接数=worker_processes*worker_connections
|
2./etc/nginx/conf.d/default.conf
server {
    listen       80;                            #---该虚拟主机站点web服务监听端口
    server_name  localhost;                     #---定义虚拟主机站点网站域名信息
    location / {
        root   /usr/share/nginx/html;           #---指定站点目录
        index  index.html index.htm;            #---定义站点首页文件(首页文件一定要放在站点目录下)
    }
    error_page   500 502 503 504  /50x.html;    #---定义错误访问请求回应信息
    location = /50x.html {                      #---匹配指定URI信息
        root   /usr/share/nginx/html;           #---设置错误页面站点目录
    }
}
五、nginx服务排查流程
1.使用nginx -t指令对配置文件语法检查
2.检查配置文件是否符合书写规范
|
规范1:{ }必须成对使用 规范2:所有指令信息后面必须有分号(;) 规范3:配置指令信息必须符合要求 |
六、企业环境常用配置
1.配置多个网站页面环境
step1 配置多个虚拟主机配置文件
[root@web01 /etc/nginx/conf.d]# vim www.conf
server {
    listen       80;
    server_name  www.aspen.com;

    location / {
        root   /var/html/www;
        index  index.html index.htm;
    }
    error_page   404 500 502 503 504  /50x.html;
    location = /50x.html {
        root   /var/html/error;
    }
}
[root@web01 /etc/nginx/conf.d]# vim bbs.conf
server {
    listen       80;
    server_name  bbs.aspen.com;

    location / {
        root   /var/html/bbs;
        index  index.html index.htm;
    }
    error_page  404 500 502 503 504  /50x.html;
    location = /50x.html {
        root   /var/html/error;
    }
}
[root@web01 /etc/nginx/conf.d]# vim blog.conf
server {
    listen       80;
    server_name  blog.aspen.com;

    location / {
        root   /var/html/blog;
        index  index.html index.htm;
    }
    error_page   404 500 502 503 504  /50x.html;
    location = /50x.html {
        root   /var/html/error;
    }
}
step2 创建站点目录并创建首页文件
[root@web01 /var]# mkdir -p html/{www,blog,error,bbs}
[root@web01 /etc/nginx/conf.d]# for name in {www,bbs,blog} ; do echo "$name.aspen.com">/var/html/$name/index.html; done
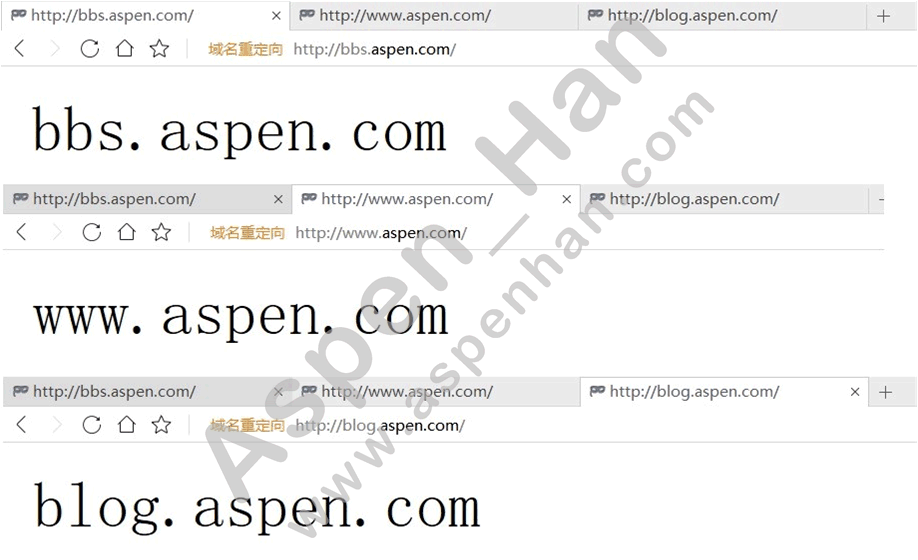
[root@web01 /etc/nginx/conf.d]# cat /var/html/www/index.html /var/html/blog/index.html /var/html/bbs/index.html
www.aspen.com
blog.aspen.com
bbs.aspen.com
[root@web01 /etc/nginx/conf.d]# vim /var/html/error/50x.html
ERROR PAGE
aspen.comstep3 配置解析信息(实际环境,配置DNS解析)
| 10.0.0.17 www.aspen.com bbs.aspen.com blog.aspen.com |
step4 结果验证
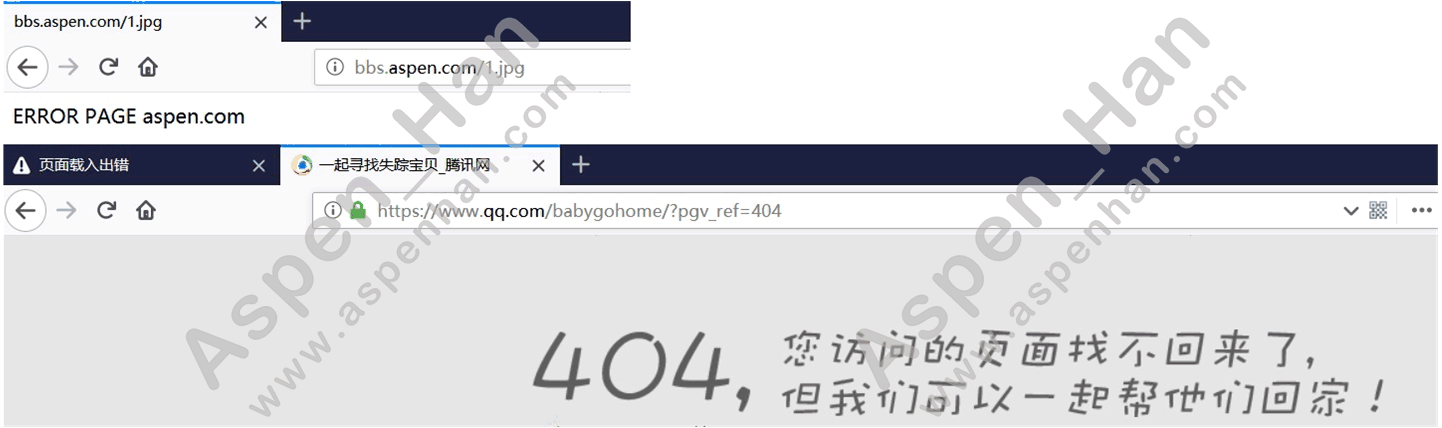
附:错误界面展示
[root@web01 /etc/nginx/conf.d]# vim bbs.conf
server {
    listen       80;
    server_name  bbs.aspen.com;

    location / {
        root   /var/html/bbs;
        index  index.html index.htm;
    }
    error_page  404 500 502 503 504  /50x.html;
    location = /50x.html {
        root  /var/html/error;
    }
}
[root@web01 /etc/nginx/conf.d]# vim www.conf
server {
    listen       8080;
    server_name  www.aspen.com;

    location / {
        root   /var/html/www;
        index  index.html index.htm;
    }
    error_page   404 500 502 503 504  https://www.qq.com/babygohome/?pgv_ref=404;
} 
2.虚拟主机的访问方式
- 基于域名方式访问(常用于企业业务环境)
[root@web01 /etc/nginx/conf.d]# vim /etc/hosts
127.0.0.1   localhost localhost.localdomain localhost4 localhost4.localdomain4
::1         localhost localhost.localdomain localhost6 localhost6.localdomain6
172.16.1.17      web01 blog.aspen.com
[root@web01 /etc/nginx/conf.d]# curl -v blog.aspen.com
* About to connect() to blog.aspen.com port 80 (#0)
*   Trying 172.16.1.17...
* Connected to blog.aspen.com (172.16.1.17) port 80 (#0)
> GET / HTTP/1.1
> User-Agent: curl/7.29.0
> Host: blog.aspen.com
> Accept: */*
>
< HTTP/1.1 200 OK
< Server: nginx/1.16.0
< Date: Tue, 23 Jul 2019 13:04:15 GMT
< Content-Type: text/html
< Content-Length: 15
< Last-Modified: Tue, 23 Jul 2019 12:30:05 GMT
< Connection: keep-alive
< ETag: "5d36fdcd-f"
< Accept-Ranges: bytes
<
blog.aspen.com
* Connection #0 to host blog.aspen.com left intact- 基于端口方式访问(常用于企业内部平台)
[root@web01 /etc/nginx/conf.d]# vim www.conf
server {
    listen       8080;
    server_name  www.aspen.com;

    location / {
        root   /var/html/www;
        index  index.html index.htm;
    }
    error_page   404 500 502 503 504  /50x.html;
    location = /50x.html {
        root   /var/html/error;
    }
}
[root@web01 /etc/nginx/conf.d]# systemctl restart nginx
[root@web01 /etc/nginx/conf.d]# ss -lntup | grep nginx
tcp    LISTEN     0      128       *:8080                  *:*                   users:(("nginx",pid=18873,fd=7),("nginx",pid=18872,fd=7))
tcp    LISTEN     0      128       *:80                    *:*                   users:(("nginx",pid=18873,fd=6),("nginx",pid=18872,fd=6))
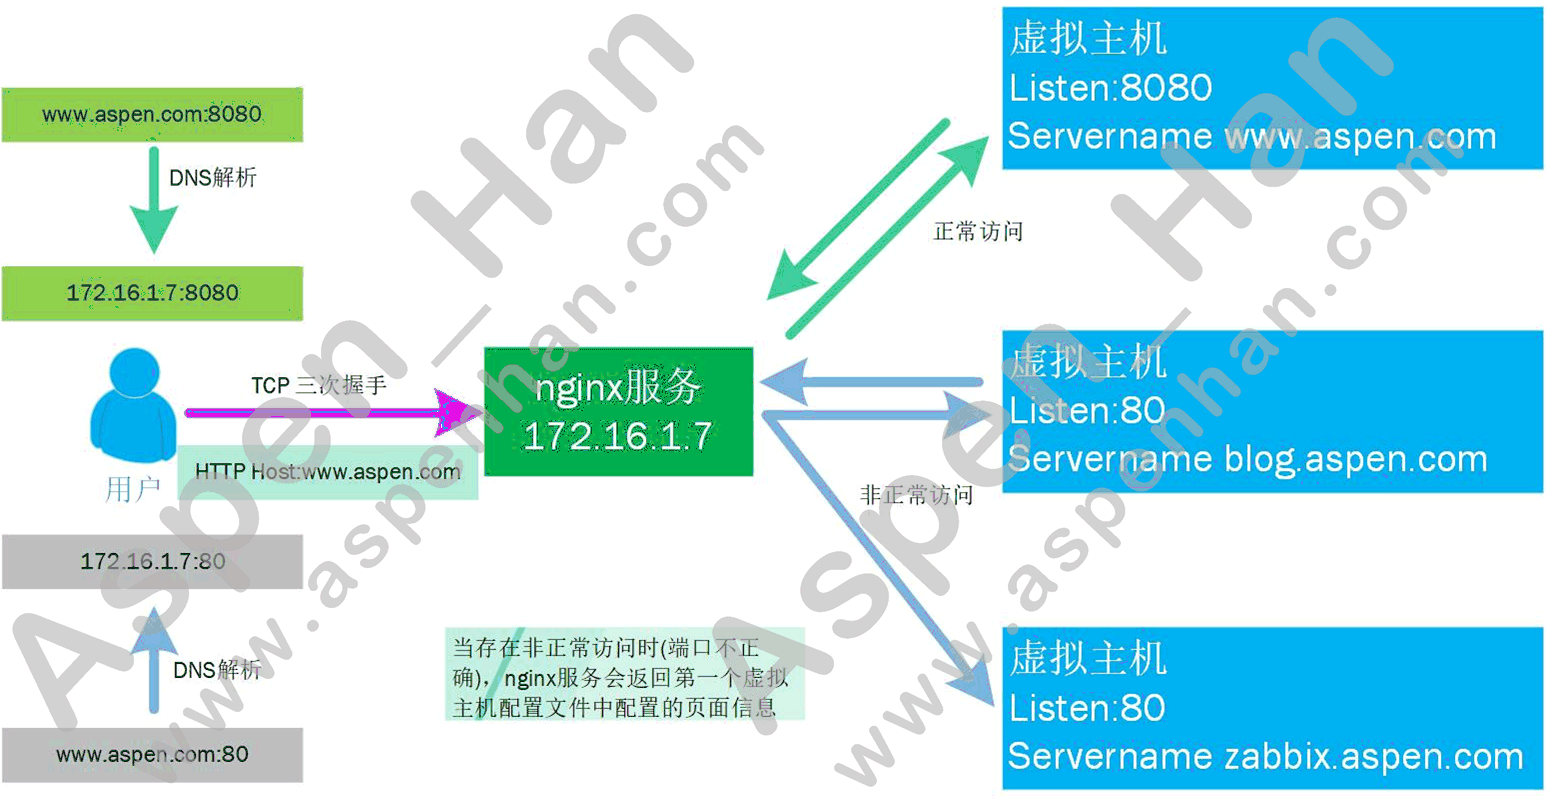
| 基于端口方式访问:客户端请求先找目标服务器对应端口,确保双方连接建立;连接建立成功后,再向服务器请求对应资源信息;当请求资源信息不存在时,会返回nginx服务虚拟配置文件目录中第一个虚拟主机配置文件;如下图所示: |
- 基于地址方式访问(常用于提升网站安全性)
[root@web01 /etc/nginx/conf.d]# curl -v 172.16.1.17
* About to connect() to 172.16.1.17 port 80 (#0)
* Trying 172.16.1.17...
* Connected to 172.16.1.17 (172.16.1.17) port 80 (#0)
> GET / HTTP/1.1
> User-Agent: curl/7.29.0
> Host: 172.16.1.17
> Accept: */*
>
< HTTP/1.1 200 OK
< Server: nginx/1.16.0
< Date: Tue, 23 Jul 2019 13:00:46 GMT
< Content-Type: text/html
< Content-Length: 14
< Last-Modified: Tue, 23 Jul 2019 12:30:05 GMT
< Connection: keep-alive
< ETag: "5d36fdcd-e"
< Accept-Ranges: bytes
<
bbs.aspen.com
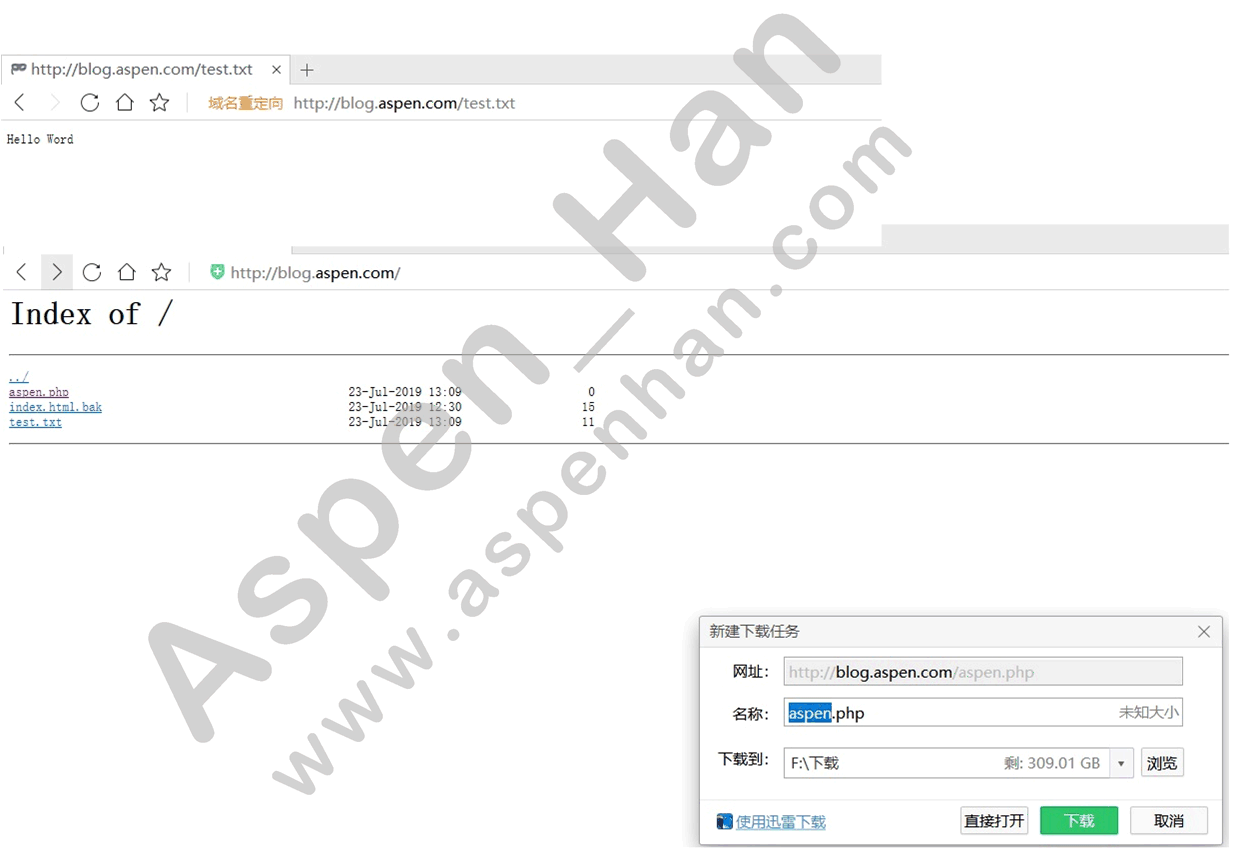
* Connection #0 to host 172.16.1.17 left intact3.显示网站目录索引信息
- 利用web服务,实现文件共享
[root@web01 /etc/nginx/conf.d]# vim blog.conf
server {
    listen       80;
    server_name  blog.aspen.com;

    location / {
        root   /var/html/blog;
        #index  index.html index.htm;
        autoindex on;
    }
    error_page   404 500 502 503 504  /50x.html;
    location = /50x.html {
        root   /var/html/error;
    }
}
[root@web01 /etc/nginx/conf.d]# systemctl restart nginx
[root@web01 /etc/nginx/conf.d]# cd /var/html/blog/
[root@web01 /var/html/blog]# echo Hello Word > test.txt
[root@web01 /var/html/blog]# touch aspen.php
[root@web01 /var/html/blog]# mv index.html index.html.bak
[root@web01 /var/html/blog]# egrep 'php|txt' /etc/nginx/mime.types
text/plain txt;| mini.types文件中记录的文件类型是nginx服务可直接处理的静态资源文件类型,nginx服务不能处理的文件格式,直接会被下载,交由用户自己处理 |
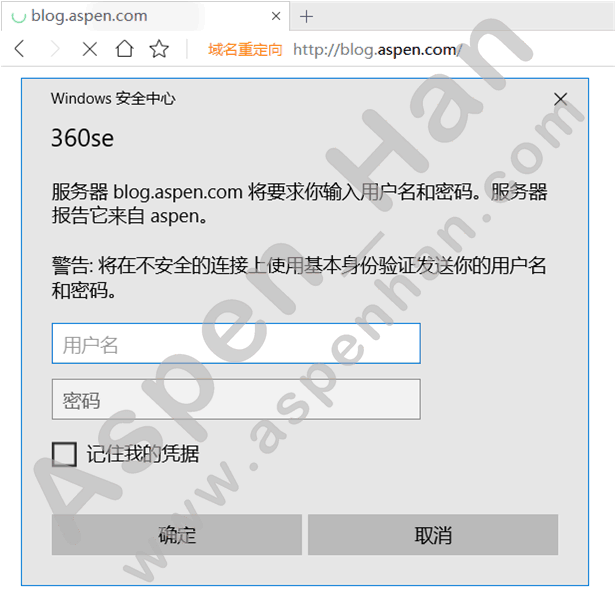
4.网站页面安全配置
- 网站页面配置认证功能
[root@web01 /etc/nginx/conf.d]# vim blog.conf
server {
    listen       80;
    server_name  blog.aspen.com;

    location / {
        root   /var/html/blog;
        #index  index.html index.htm;
        autoindex on;
        auth_basic           "aspen";                   #---定义提示框名称
        auth_basic_user_file htpasswd;                  #---htpasswd是一个相对路径 相对于nginx.conf所在目录
    }
    error_page   404 500 502 503 504  /50x.html;
    location = /50x.html {
        root   /var/html/error;
    }
}
[root@web01 /etc/nginx/conf.d]# yum install -y httpd-tools
......
Installed:
  httpd-tools.x86_64 0:2.4.6-89.el7.centos

Complete!
[root@web01 /etc/nginx]# htpasswd -bc /etc/nginx/htpasswd aspen 123456
Adding password for user aspen
[root@web01 /etc/nginx]# htpasswd -bc /etc/nginx/htpasswd Aspen 123456
Adding password for user Aspen
[root@web01 /etc/nginx]# cat htpasswd
Aspen:$apr1$vwKkmydL$yVKI/2jBKrzA7k19IDV8k1
[root@web01 /etc/nginx]# htpasswd -b /etc/nginx/htpasswd aspen 123456
Adding password for user aspen
[root@web01 /etc/nginx]# cat htpasswd
Aspen:$apr1$vwKkmydL$yVKI/2jBKrzA7k19IDV8k1
aspen:$apr1$qQln7kaj$UFH.35aQQkELozNmV7hSP1| htpasswd命令参数 -b 非交互式为用户设置密码 -c 创建密码文件(生成首个用户时使用该密码文件,后续为密码文件追加用户时,不能使用该参数) -D 删除指定用户 |
- 访问用户访问资源策略阻止功能(防止用户攻击网站/爬网站资源)
[root@web01 /etc/nginx/conf.d]# vim blog.conf
server {
    listen       80;
    server_name  blog.aspen.com;

    location / {
        root   /var/html/blog;
        #index  index.html index.htm;
        autoindex on;
        auth_basic           "FTP";
        auth_basic_user_file htpasswd;
    }
    location /authen_pass {
                root   /var/html/blog;
                autoindex on;
                allow  10.0.0.0/24;
                deny 172.16.1.0/24;
    }
    location /authen_failed {
                root   /var/html/blog;
                autoindex on;
                allow 172.16.1.0/24;
                deny 10.0.0.0/24;
    }
    #error_page   404 500 502 503 504  /50x.html;
    #location = /50x.html {
    #  root   /var/html/error;
    #}
}
[root@web01 /etc/nginx/conf.d]# systemctl restart nginx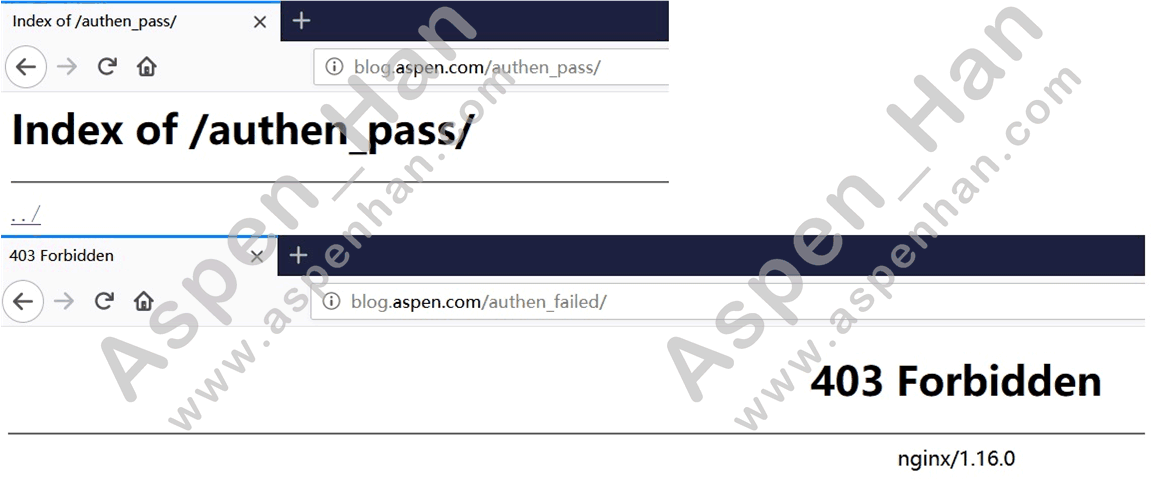
| 附:401状态码
网站认证失败
附:403状态码 对访问用户地址的进行阻止
访问的首页文件不存在
其他HTTP状态请参阅: HTTP协议基础 |
5.监控状态页部署
[root@web01 /etc/nginx/conf.d]# vim state.conf
server {
        listen  80;
        server_name     state.aspen.com;
        location / {
                stub_status;
        }
}
|
监控页面信息 Active connections: 2 激活链接数量(当前并发连接数) server accepts handled requests Reading: 0 Writing: 1 Waiting: 1 |
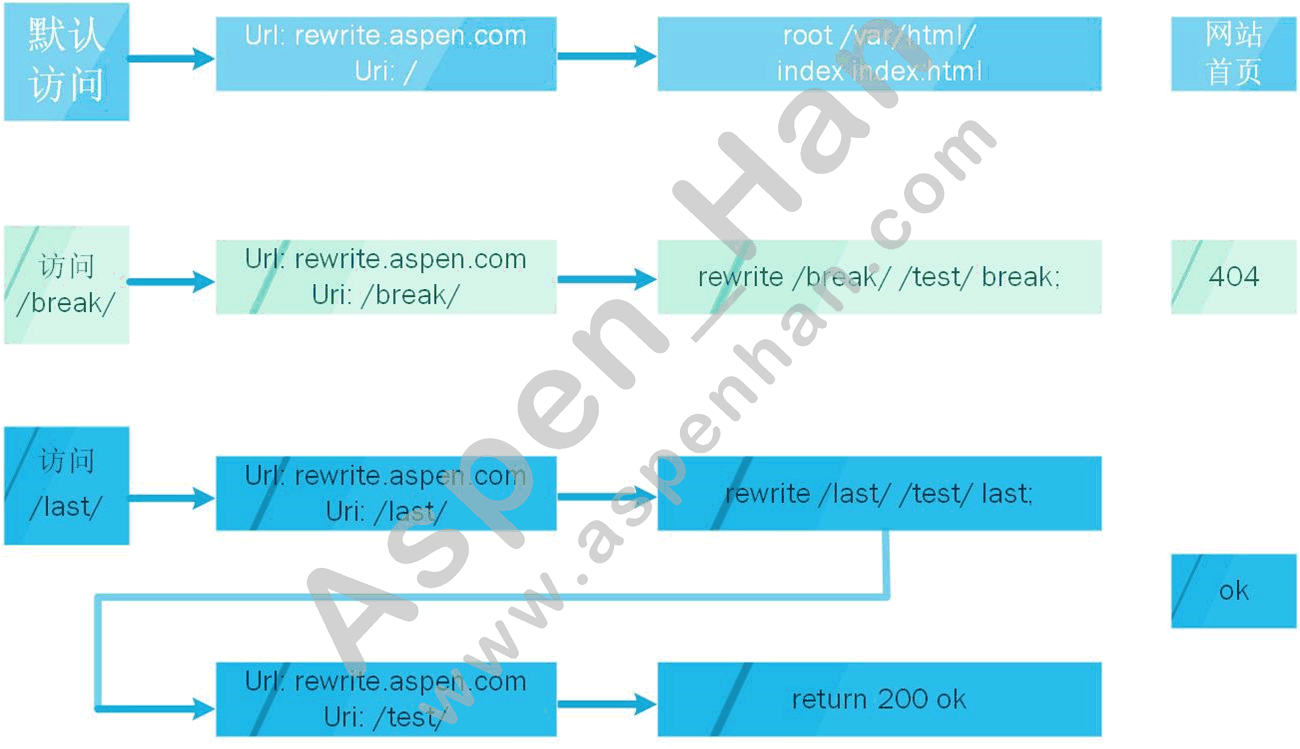
6.网站页面跳转
- rewrite
nginx服务rewrite模块说明
| 格式:rewrite 匹配跳转信息 跳转地址 跳转标记[Flag] |
|
[Flag]
last 一旦跳转完毕,会继续访问页面信息(不要求存在跳转目录和首页文件)
break 一旦跳转完毕,停止后续操作过程(要求存在调转目录和首页文件)
redirect 临时跳转
permanent 永久跳转
last和break跳转不会显示跳转的地址信息 |
|
rewrite常用内置变量
$server_name #当前请求域名
$request_filename #当前请求的文件路径名(带网站的主目录)
$request_uri #当前请求的文件路径名(不带网站的主目录)
$scheme #当前请求的协议
|
last和break跳转补充说明
[root@web01 ~]# vim /etc/nginx/conf.d/rewrite.conf
        server {
           listen            80;
           server_name       rewrite.aspen.com;
           root              /html;
           index             index.html;
           location  ~ /break/ {
               rewrite  /break/  /test/  break;  --- 有跳转目录吗  有首页文件
           }
           location  ~ /last/  {
               rewrite  /last/  /test/  last;    --- 不需要必须有跳转目录吗  不需要有首页文件
           }
           location   /test/ {
               default_type   application/json;
               return 200 'ok';
           }
        }
- return
| 格式:return 301/302 URL/URI |
URI跳转
[root@web01 /]# cd /etc/nginx/conf.d/
[root@web01 /etc/nginx/conf.d]# vim rewrite.conf
server {
        listen 80;
        server_name rewrite.aspen.com;
        root /var/html/www;
        index index.html;
        location /2014 {
                rewrite ^/2014/(.*)$ /2018/$1 redirect;
        }
}
[root@web01 /etc/nginx/conf.d]# nginx -t
nginx: the configuration file /etc/nginx/nginx.conf syntax is ok
nginx: configuration file /etc/nginx/nginx.conf test is successful
[root@web01 /etc/nginx/conf.d]# systemctl restart nginx
[root@web01 /etc/nginx/conf.d]# curl rewrite.aspen.com/2014/aaa/bbb/num.html -Lv
.....
1234567890
* Connection #0 to host rewrite.aspen.com left intact

[root@web01 /etc/nginx/conf.d]# tree /var/html/www/
/var/html/www/
├── 2018
│   └── aaa
│       └── bbb
│           └── num.html
└── index.html

3 directories, 2 files
[root@web01 /etc/nginx/conf.d]# cat /var/html/www/2018/aaa/bbb/num.html
1234567890
URL跳转
[root@web01 /etc/nginx/conf.d]# vim rewrite.conf
server {
        listen 80;
        server_name rewrite.aspen.com rewrite.aspen_han.com;
        location / {
                root /var/html/www;
                index index.html;
                if ($http_host ~* rewrite.aspen.com) {
                        rewrite /(.*) http://rewrite.aspen_han.com/$1 redirect;
                }
        }
}
[root@web01 /etc/nginx/conf.d]# systemctl restart nginx

[root@web01 /etc/nginx/conf.d]# curl -vL rewrite.aspen.com
......
www.aspen.com
* Connection #1 to host rewrite.aspen_han.com left intact
隐藏网站目录结构
[root@web01 /etc/nginx/conf.d]# vim rewrite.conf
server {
   listen 80;
   server_name rewrite.aspen.com;
   location / {
      root /var/html/www;
      index index.html;
      rewrite ^/num-(.*)-(.*)-(.*).html /num/$1/$2/$3/num_$3.html last;
   }
}
[root@web01 /etc/nginx/conf.d]# systemctl restart nginx

[root@web01 /etc/nginx/conf.d]# tree /var/html/www/
/var/html/www/
├── 2018
│   └── aaa
│       └── bbb
│           └── num.html
├── index.html
└── num
    └── 12
        └── 23
            └── 34
                └── num_34.html

7 directories, 3 files
[root@web01 /etc/nginx/conf.d]# cat /var/html/www/num/12/23/34/num_34.html
34
34
34
34
34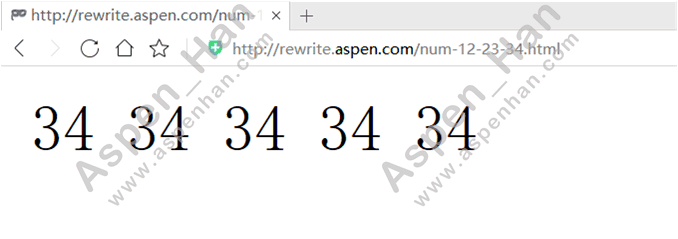
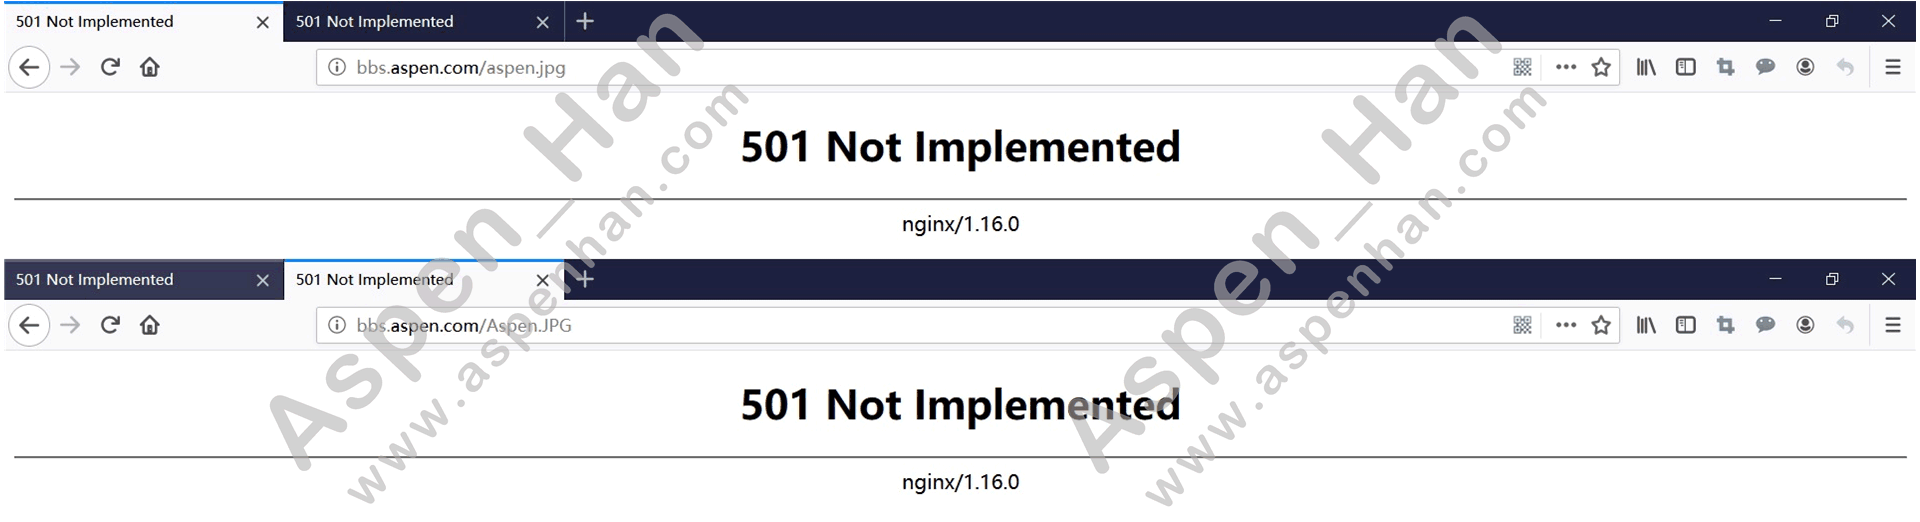
7.location功能区块---匹配网站URI
| 符号 | 含义 | 优先级 |
|---|---|---|
| = | 精确匹配 | 6 |
| ^~ | 优先匹配 | 5 |
| ~ | 模糊匹配(敏感字母大小写) | 4 |
| ~* | 模糊匹配(不敏感字母大小写) | 3 |
| /目录/ | 路径匹配 | 2 |
| / | 默认匹配 | 1 |
/路径/和~用例
[root@web01 /var/html/bbs/ds]# vim /etc/nginx/conf.d/bbs.conf
server{
listen 80;
   server_name bbs.aspen.com;
   root /var/html/bbs;
   index aspen.jpg;
   location /bbs/ {
      root /var/html/b2s;
      index aspen.jpg;
   }
   location ~ /ds/ {
      root /var/html/bbs;
      index aspen.jpg;
   }
}
[root@web01 /var/html/bbs/ds]# systemctl restart nginx
~*用例
[root@web01 /var/html/bbs/ds]# vim /etc/nginx/conf.d/bbs.conf
server{
listen 80;
   server_name bbs.aspen.com;
   location ~* \.(jpg|jpeg|gif)$ {
      #root /var/html/bbs;
      return 501;
   }
}
七、HTTPs访问
1.安装nginx时,开启SSL模块(--with-http_ssl_module)
[root@web01 ~]# nginx -V
nginx version: nginx/1.16.0
built by gcc 4.8.5 20150623 (Red Hat 4.8.5-36) (GCC)
built with OpenSSL 1.0.2k-fips  26 Jan 2017
TLS SNI support enabled
configure arguments: --prefix=/etc/nginx --sbin-path=/usr/sbin/nginx --modules-path=/usr/lib64/nginx/modules --conf-path=/etc/nginx/nginx.conf --error-log-path=/var/log/nginx/error.log --http-log-path=/var/log/nginx/access.log --pid-path=/var/run/nginx.pid --lock-path=/var/run/nginx.lock --http-client-body-temp-path=/var/cache/nginx/client_temp --http-proxy-temp-path=/var/cache/nginx/proxy_temp --http-fastcgi-temp-path=/var/cache/nginx/fastcgi_temp --http-uwsgi-temp-path=/var/cache/nginx/uwsgi_temp --http-scgi-temp-path=/var/cache/nginx/scgi_temp --user=nginx --group=nginx --with-compat --with-file-aio --with-threads --with-http_addition_module --with-http_auth_request_module --with-http_dav_module --with-http_flv_module --with-http_gunzip_module --with-http_gzip_static_module --with-http_mp4_module --with-http_random_index_module --with-http_realip_module --with-http_secure_link_module --with-http_slice_module --with-http_ssl_module --with-http_stub_status_module --with-http_sub_module --with-http_v2_module --with-mail --with-mail_ssl_module --with-stream --with-stream_realip_module --with-stream_ssl_module --with-stream_ssl_preread_module --with-cc-opt='-O2 -g -pipe -Wall -Wp,-D_FORTIFY_SOURCE=2 -fexceptions -fstack-protector-strong --param=ssp-buffer-size=4 -grecord-gcc-switches -m64 -mtune=generic -fPIC' --with-ld-opt='-Wl,-z,relro -Wl,-z,now -pie'
2.虚拟主机配置文件中开始SSL功能
[root@web01 /etc/nginx/conf.d]# vim www.conf
server {
    listen       443 ssl;
    server_name  www.aspen.com;
    ssl_certificate     /etc/nginx/conf/server.crt;       #注意证书的保存路径以及名称;
    ssl_certificate_key /etc/nginx/conf/server.key;       #注意私钥的保存路径以及证书;
    location / {
        root   /var/html/www;
        index  index.html index.htm;
    }
}
3.创建私钥与证书(先创建私钥,再申请证书)
|
创建私钥 openssl genrsa -idea -out server.key 2048 #在指定路径下创建指定名称的私钥信息 创建证书 openssl req -days 36500 -x509 -sha256 -nodes -newkey rsa:2048 -keyout server.key -out server.crt #在指定路径下创建指定名称的证书信息 -days 36500---设置证书时效
-x509---设置证书文件信息格式
-sha256---证书数据加密方式
-nodes -newkey---去掉私钥密码信息
rsa:2048---识别私钥加密信息
-keyout---读取私钥文件
-out---输出一个证书
附:生产环境中不可使用此方法生成证书,该证书不会被互联网CA权威承认,是黑户证书; |
[root@web01 /etc/nginx/conf.d]# cd ..
[root@web01 /etc/nginx]# mkdir conf
[root@web01 /etc/nginx]# cd conf
[root@web01 /etc/nginx/conf]# openssl genrsa -idea -out server.key 2048
Generating RSA private key, 2048 bit long modulus
......................................................................+++
........................+++
e is 65537 (0x10001)
Enter pass phrase for server.key:
Verifying - Enter pass phrase for server.key:
-----------------------------------------------------------------------------------------------------------------------
#模拟:利用私钥,创建本地证书;
[root@web01 /etc/nginx/conf]# openssl req -days 36500 -x509 -sha256 -nodes -newkey rsa:2048 -keyout server.key -out server.crt
Generating a 2048 bit RSA private key
.....................................................+++
.....................................+++
writing new private key to 'server.key'
-----
You are about to be asked to enter information that will be incorporated
into your certificate request.
What you are about to enter is what is called a Distinguished Name or a DN.
There are quite a few fields but you can leave some blank
For some fields there will be a default value,
If you enter '.', the field will be left blank.
-----
Country Name (2 letter code) [XX]:CH
State or Province Name (full name) []:BJ
Locality Name (eg, city) [Default City]:BJ
Organization Name (eg, company) [Default Company Ltd]:DY
Organizational Unit Name (eg, section) []:Linux
Common Name (eg, your name or your server's hostname) []:Web01
Email Address []:333@qq.com
验证HTTPs功能
[root@web01 /etc/nginx/conf]# nginx -t
nginx: the configuration file /etc/nginx/nginx.conf syntax is ok
nginx: configuration file /etc/nginx/nginx.conf test is successful
[root@web01 /etc/nginx/conf]# systemctl restart nginx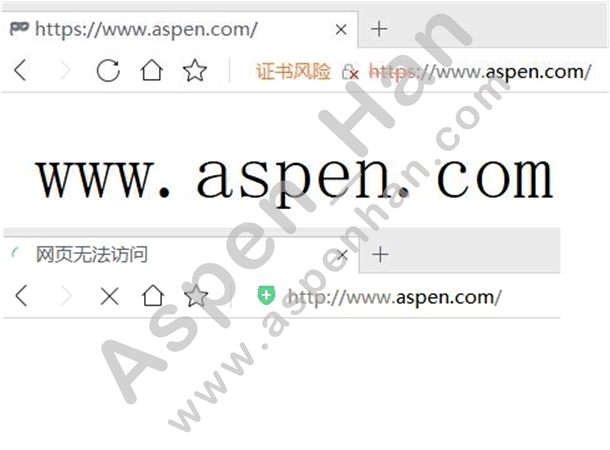
4.实现HTTP跳转为HTTPs
[root@web01 /etc/nginx/conf.d]# vim www.conf
server{
    listen 80;
    server_name www.aspen.com;
        rewrite (.*)  https://$server_name/$1 redirect;
}
server {
    listen       443 ssl;
    server_name  www.aspen.com;
    ssl_certificate     /etc/nginx/conf/server.crt;
    ssl_certificate_key /etc/nginx/conf/server.key;
    location / {
        root   /var/html/www;
        index  index.html index.htm;
    }
}
[root@web01 /etc/nginx/conf.d]# systemctl restart nginx
附:思维导图